A hailstorm rolls through your neighborhood. The next morning, you notice something isn't right — granules in the gutters, a dent in the gutter guard, maybe a small leak you've never seen before. You're not sure if it's serious, who to call, or what happens next.
That uncertainty is exactly what we built this guide to eliminate.
At Ripple Roofing, we've helped hundreds of Central Texas homeowners navigate the storm damage restoration process from start to finish. Whether you're dealing with your first insurance claim or you've been through this before, this guide walks you through every single step — so you always know what's happening, what's coming next, and what it means for your wallet.
Questions along the way? Call us at (512) 763-5277. We're happy to walk through this with you at no cost.
The 10-Step Storm Damage Restoration Process
Here's a quick overview of the full process before we dive in:
- Free Inspection
- Filing Your Insurance Claim
- Adjuster Meeting
- Claim Decision
- Scope Review
- Sign Agreement, Select Materials & Deposit
- Scheduling & Materials
- Installation Day
- Final Inspection
- Supplement Finalization & Final Close-Out
Most homeowners are surprised by how smooth this process can be when you have an experienced contractor in your corner. Let's walk through each step in detail.
Step 1: Free Inspection
Goal: Determine if you have legitimate storm damage worth claiming.
Everything starts with a free, no-obligation inspection of your property. You don't need to know whether the damage is "bad enough" to file a claim — that's our job.
What We Inspect
When we arrive at your home, we evaluate more than just the roof. Storm damage often shows up in places homeowners don't think to look:
- Roof: Missing, cracked, or bruised shingles; granule loss; exposed decking; damage around pipe boots, ridge caps, and valleys
- Gutters & downspouts: Dents, dings, and granule buildup (a major indicator of hail impact on shingles)
- Siding: Dents, cracks, chipped paint, or compromised panels from hail or wind-driven debris
- Fascia & soffit: Hidden damage that's easy to miss but covered by insurance
- Windows & screens: Hail can crack or break frames and screens, which are often claimable
- HVAC units & skylights: Frequently overlooked, but hail can damage fins and glass
What You'll Get
After the inspection, we give you a straight answer: Is there enough storm damage to support an insurance claim? If the answer is no, we'll tell you that honestly. We don't manufacture claims — that's fraud and it's not how we operate.
If there IS damage, we'll document everything with photos and explain exactly what we found. You'll never be left guessing.
Pro tip: Even if a previous contractor told you there was no damage, it's worth a second opinion. Hail damage can be subtle, and not every inspector knows what to look for on different roofing materials.
Step 2: Filing Your Insurance Claim
Goal: Get your claim officially started.
Once we've confirmed storm damage, you'll contact your insurance company to open a claim. Most homeowners have never done this before — here's how it works.
How to File
Call the claims number on the back of your insurance card or log into your insurance company's app or website. You'll need:
- Your policy number
- The date of the storm (or approximate date)
- A brief description of the damage
You don't need to have a full assessment ready — you're just opening the claim. You'll receive a claim number immediately, which you'll use for all future communication.
We'll Help You Through It
We can guide you on exactly what to say when you call. Insurance companies ask specific questions, and the way you answer can matter. We'll make sure you don't accidentally under-report damage or create confusion.
After the claim is filed, your insurance company will assign an adjuster to come inspect your property. This is where Step 3 begins.
Important Notes on Timing
- File promptly. Most Texas policies require you to file within 1-2 years of the storm, but the sooner the better. Evidence disappears, and insurance companies are more skeptical of delayed claims.
- Don't start repairs before filing. If you replace damaged items before the adjuster sees them, you may lose the ability to claim them.
Step 3: Adjuster Meeting
Goal: Maximize claim accuracy and make sure all damage is documented.
This is one of the most important steps in the entire process — and it's where having Ripple Roofing in your corner makes the biggest difference.
What Is an Insurance Adjuster?
Your insurance company sends a field adjuster to inspect your property and determine the scope of damage. It's important to understand: the adjuster works for the insurance company, not for you. Their job is to accurately assess damage, but they're also under pressure to manage claim costs.
That doesn't mean they're dishonest — but it does mean you shouldn't go through the inspection alone.
What We Do During the Adjuster Meeting
We meet the adjuster on-site and conduct the inspection alongside them. Here's what that means for you:
- We make sure every area gets inspected. Adjusters sometimes miss secondary structures, siding, windows, or HVAC — especially if they're rushed or unfamiliar with your specific roofing material.
- We document damage with our own photos so there's no dispute later about what was found.
- We advocate on your behalf. If the adjuster misses something or undervalues the damage, we flag it in real time.
- We speak the language. Insurance adjusters use specific terminology (Xactimate pricing software, per-square pricing, ACV vs. RCV). We know how the system works.
Most homeowners who go through this step alone end up with an incomplete scope — and that leads to out-of-pocket costs that should have been covered.
Step 4: Claim Decision
Goal: Understand exactly what your insurance will cover.
After the adjuster's inspection, your insurance company reviews the findings and issues a formal decision. There are three possible outcomes:
Approved (Full or Partial)
The most common outcome when legitimate storm damage exists. Your insurance company will send you a loss summary document (sometimes called an "Explanation of Benefits" or "Scope of Loss") that details:
- What's being covered
- The estimated cost of repairs
- Your Actual Cash Value (ACV) payment — the first check
- Your deductible (what you'll owe out of pocket)
- The Replacement Cost Value (RCV) — the remaining payment released after work is completed
What's ACV vs. RCV? Your policy likely has a depreciation clause. The insurance company initially pays ACV, which is the replacement cost minus depreciation for wear and age. Once the work is completed, they release the remaining depreciated value (called "recoverable depreciation"), bringing you up to the full RCV. This is the second check.
Request for More Information
Sometimes the insurance company wants additional documentation before approving. We can help gather and submit what's needed.
Denied Claim
Claims can be denied for various reasons — missed filing windows, pre-existing damage, or an incomplete adjuster report. If your claim is denied but we found legitimate storm damage, we can assist you in filing a supplemental report or connecting you with a licensed public adjuster who specializes in appeals.
Step 5: Scope Review
Goal: Understand what was approved and identify anything that may be missing.
Once we receive the insurance company's approved scope, we review it line by line. This is an important checkpoint — but it doesn't hold up your project.
What We're Looking For
The approved scope is what the adjuster documented during Step 3. We compare it against what we actually found during our inspection and flag anything that looks incomplete or undervalued:
- Code upgrades: Texas building codes require certain improvements when more than 50% of a roof is replaced. Insurance must cover these, but they're often left off the initial scope.
- Missed items: Additional layers of decking, specialty materials, gutters, siding, or secondary structures
- Underpaid line items: The pricing in Xactimate (the software adjusters use) can be set below current market rates
- Material price differences: If current material costs exceed the approved amounts, we document that for supplementing
What Happens Next
If everything looks complete, great — we move straight to Step 6. If items are missing, we begin the supplement process. Importantly, we don't put your project on hold waiting for supplements to resolve. We move forward with the approved scope, and supplements run alongside and after the job. More on that in Step 10.
What is a supplement? A supplement is a formal request to the insurance company to add or increase line items that were missed or undervalued. We submit these with supporting documentation, photos, and pricing justification. Most are approved — it just takes someone who knows what to ask for and how to document it.
Step 6: Sign Agreement, Select Materials & Deposit
Goal: Lock in the project on the current approved scope and get on the schedule.
We don't wait for every supplement to be resolved before getting started. Once we've reviewed the scope and the project is ready to move forward, we sign the agreement, pick materials, collect a deposit, and get you on the calendar.
Sign the Agreement
You'll sign a formal contract based on the currently approved insurance scope. If supplements are pending, any additional approved amounts will be applied when they come in — the agreement reflects the work being done, and the final invoice is reconciled once all approvals are in.
Select Your Materials
This is where it gets fun. You'll choose:
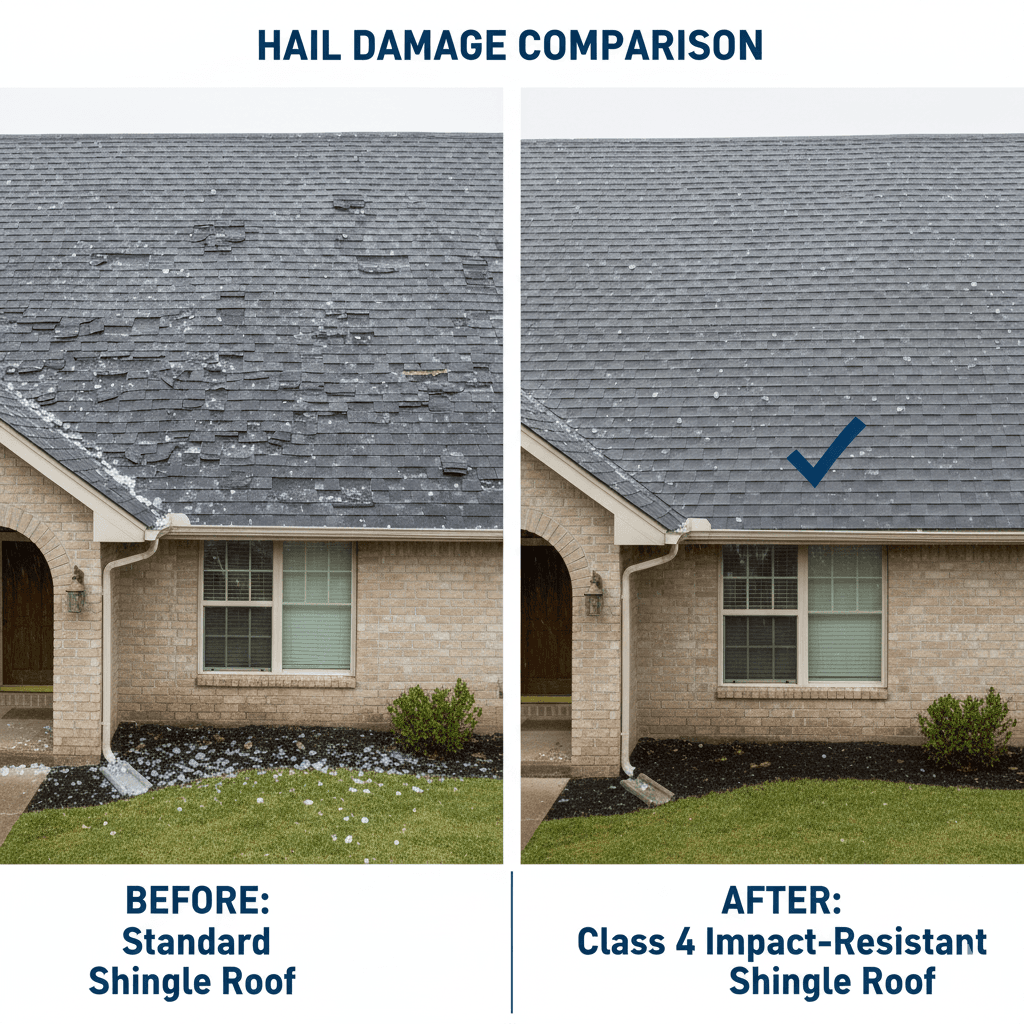
- Shingle color and style (we'll bring samples and can help you visualize options on your home)
- Roofing system upgrades — impact-resistant shingles (Class 3 or Class 4) can qualify you for insurance discounts of 20-30% on your premium
- Drip edge, ice & water shield, and underlayment options if you want to upgrade beyond the insurance-approved standard
- Additional projects like gutters, siding, or window trim if they were part of the claim or if you'd like to bundle work
Deposit
We collect a deposit to confirm your spot on the schedule and cover material orders. The deposit amount will be outlined in your agreement.
Your Out-of-Pocket Cost
| What You Pay | What Insurance Pays |
|---|---|
| Your deductible | The rest of the approved scope |
| Any material upgrades you choose | Covered materials at standard pricing |
That's the baseline. If supplements are approved — before, during, or after the job — those amounts go back through insurance and reduce or eliminate any gap. If a contractor tells you they can "waive your deductible" — walk away. That's insurance fraud in Texas and puts you at legal risk.
Step 7: Scheduling & Materials
Goal: Get everything ready for a smooth, efficient installation day.
Once the contract is signed and materials are selected, we handle all the logistics.
What to Expect
- Scheduling: We'll find a date that works for you and your family. Most roof installations take 1 day.
- Material order: We order your selected materials directly from the manufacturer or distributor.
- Delivery: Materials are delivered to your home typically 1-2 days before the installation date. You'll receive a heads up when to expect the delivery truck.
- Permit: If required by your city or county, we pull the necessary permit. This is especially important in Austin, Round Rock, Cedar Park, and other municipalities with stricter code enforcement.
- HOA coordination: If your neighborhood has an HOA with shingle color restrictions, we handle that coordination.
Note on supplements: While we're scheduling and building, the supplement process may be running in parallel. Supplement requests that were submitted after the scope review (Step 5) will continue being worked — you don't need to do anything. We'll keep you updated on where things stand.
Preparing Your Home
Here's how to help installation day go smoothly:
- Move vehicles out of the driveway and away from the home (we'll be using it for material staging)
- Inform neighbors if they have close driveways or shared access points
- Secure or remove fragile wall decorations inside — the hammering vibration can shake items off walls
- Keep pets indoors or in a safe area away from the crew
Step 8: Installation Day
Goal: Restore your home quickly and professionally.
Installation day is when everything comes together. Here's what happens from start to finish.
What to Expect
Morning setup (7-8am): The crew arrives, sets up safety equipment, ladders, and tarps to protect your landscaping, siding, and driveway from falling debris.
Tear-off: We remove all existing shingles, inspect the decking below for soft spots, rot, or damage, and replace any compromised areas. You'll be charged the insurance-approved rate for any decking repairs.
Installation:
- New underlayment (often synthetic, which is superior to felt)
- Ice & water shield in valleys and around all penetrations
- New shingles, installed per manufacturer specs to maintain warranty
- New drip edge (required by code in most Texas municipalities)
- New pipe boots, flashing, and ridge cap
- Ridge vent or other ventilation components as specified
Cleanup: This is something we take seriously. We use magnetic rollers to pick up nails from the yard and driveway, clean gutters of debris, and do a full sweep of the property. We aim to leave your home looking better than when we arrived.
End of day walkthrough: Before we leave, we walk the roof and perimeter with you (or do it on your behalf if you're not home) to confirm everything looks right.
How Long Does It Take?
Most residential roofs are completed in one day. Larger homes, complex rooflines, or multi-project jobs (roof + siding) may take 2 days. We'll give you an accurate timeline before we start.
Step 9: Final Inspection
Goal: Make sure you're 100% satisfied with the work.
Before we close out your project, we do a full final walkthrough together.
What We Review
- Roof surface: Uniform shingle installation, proper nail patterns, no exposed underlayment
- Flashing & boots: Properly sealed around chimneys, vents, and skylights
- Gutters: Clean, properly aligned, not damaged during installation
- Yard & driveway: No debris, nails, or material waste
- Siding or additional work: If we performed any additional restoration, we inspect that too
We ask you to walk the property with us. You should look at everything — ask questions, point out anything that concerns you. We want you 100% satisfied before we submit final paperwork.
Quality Standards
Ripple Roofing installs to manufacturer specifications to ensure your material warranty remains valid. We're a CertainTeed ShingleMaster® certified contractor, which means our installs are held to a higher standard than most contractors in the region.
Step 10: Supplement Finalization & Final Close-Out
Goal: Resolve all pending supplements, finalize the full scope, and close out the project.
This is where everything gets wrapped up — and it's worth understanding that the job being physically complete and the insurance process being complete are two separate things. The roof is done, but supplements may still be in progress.
After Installation: Supplements May Still Be Open
This is completely normal and expected. Supplements submitted before or during the job often have response times of days to a few weeks depending on the insurance company. The roof is on, you're protected — we're just waiting on the insurance side to finalize the numbers.
During this time we're:
- Following up with the insurance company on any open supplements
- Responding to requests for additional documentation or photos
- Submitting any final supplements that could only be identified once the roof was torn off (such as decking damage discovered during installation)
Once All Supplements Are Approved
When the insurance company has signed off on the full scope — original approval plus any supplements — we finalize the project:
- We reconcile the complete approved scope against the work performed
- We issue the final invoice reflecting everything that was covered
- You (or we, on your behalf) submit completion documentation to your insurance company
- Insurance releases the RCV holdback (recoverable depreciation) — typically within 7-14 business days
- You receive the final check and pay the remaining contractor balance
You never pay more than your deductible plus any upgrades you selected. Any additional amounts recovered through supplements go back through the insurance settlement — not to you out of pocket.
How Long Does This Take?
The physical roof installation is typically done in a day. The supplement and close-out process after that can take anywhere from 1 to 6 weeks, depending on the insurance company's responsiveness and the complexity of the supplements. We'll keep you informed throughout and let you know as soon as everything is finalized.
Your Warranty Coverage
After installation, you'll receive:
- Manufacturer's shingle warranty — covers defects in the shingle itself. With CertainTeed, this can be a 50-year limited warranty depending on the product line selected.
- Workmanship warranty — covers installation errors. Ripple Roofing provides a workmanship warranty on all projects.
- System warranty (if applicable) — products like CertainTeed's SureStart® warranty cover the entire roofing system as an integrated unit, providing the strongest protection available.
Keep all warranty documentation in a safe place. You'll want it if you sell the home (warranties are transferable and add value) or if any issue arises down the road.
What You Can Expect From Us
We know you have choices when it comes to who handles your storm restoration. Here's what sets Ripple Roofing apart:
✔ Clear communication every step of the way You'll never be left wondering where things stand. We keep you updated throughout the inspection, claim process, supplements, scheduling, and installation.
✔ Genuine help navigating the insurance process We've been through hundreds of insurance claims. We know what insurers look for, what adjusters miss, and how to maximize your legitimate claim. We don't manufacture damage — but we make sure real damage gets properly documented and paid.
✔ Quality workmanship and materials We use industry-leading products and install to manufacturer specs. We're not the cheapest contractor in town, and we don't try to be. We're the one you call when you want it done right.
✔ No surprises on cost You'll pay your deductible. That's it (plus any upgrades you choose). We go over the numbers before any work begins. No hidden fees, no change orders after the fact.
Frequently Asked Questions
How long does the whole process take?
From initial inspection to installation, the process typically takes 3-8 weeks. The biggest variable is the insurance company's timeline for claim approval. Installation itself is usually just 1 day. After installation, supplement resolution and final close-out can take an additional 1-6 weeks depending on the insurance company.
Will my insurance rates go up if I file a claim?
In most cases, weather-related claims do not raise your premiums in Texas — because they're not caused by your actions. Rates are more likely to go up in your entire zip code due to regional risk than because of your individual claim. Always confirm with your insurance agent.
What if my deductible is really high?
Texas law allows insurance companies to issue percentage-based deductibles for wind and hail (often 1-2% of the home's insured value). This is different from a flat-dollar deductible. If your deductible feels too high, we can help you understand exactly what it is and whether the claim still makes sense financially.
What if my claim is denied?
A denial isn't necessarily the end of the road. We can review the denial reason, provide supplemental documentation, or refer you to a licensed public adjuster who specializes in disputed claims.
Do I have to be home during installation?
No — though we recommend being home for the end-of-day walkthrough. Many of our customers are at work during the day. We'll keep you updated via phone and send photos when the job is done.
Can I do a roof replacement without an insurance claim?
Absolutely. If the damage is older, below your deductible, or you'd simply prefer to pay out of pocket, we provide competitive cash pricing on all roofing work.
Ready to Get Started?
If a storm has hit your area recently — or if you've noticed damage you haven't had looked at yet — don't wait. Storm damage gets worse over time as water intrusion causes rot, mold, and structural issues.
A free inspection takes about 45-60 minutes and comes with zero obligation. We'll give you a straight answer about what we find.
Schedule your free inspection or call us directly at (512) 763-5277.
We're here to make this process simple, transparent, and stress-free — from the first inspection to the final warranty document.
Ripple Roofing & Construction serves Austin, Round Rock, Cedar Park, Georgetown, Pflugerville, Leander, and surrounding Central Texas communities. Licensed, insured, and CertainTeed ShingleMaster® certified.